In today’s world, AI-based tools have revolutionized the way we edit photos. Pixverse AI, a cutting-edge photo editing tool, allows users to make quick and accurate adjustments to their images. One of the most sought-after features is the ability to remove masks or unwanted objects from photos effortlessly. Whether you’re a photographer looking to improve your shots or an everyday user who wants to enhance a social media post, understanding how to use Pixverse AI to remove a mask from a photo can significantly enhance your workflow.
This article will guide you step-by-step on how to use Pixverse AI for mask removal in photos, explaining the technology behind it, the process involved, and tips for getting the best results. By the end of this article, you will be able to remove masks or other unwanted objects from your images with ease and precision, creating professional-looking photos in no time.
What is Pixverse AI?
Pixverse AI is a powerful and intuitive photo editing tool that utilizes machine learning algorithms to perform various photo enhancement tasks, including object removal, background adjustment, and more. By applying AI-driven technology, Pixverse automates the editing process, making it simple for anyone – even those with no prior experience in photo editing – to enhance their images.
The platform focuses on providing users with an easy-to-use interface, allowing them to edit their photos without needing advanced skills or software. One of the most impressive features of Pixverse AI is its ability to intelligently detect and remove masks from photos, a tool that can be highly beneficial for content creators, e-commerce businesses, and photographers.
Why Use Pixverse AI for Mask Removal?
Before diving into the step-by-step guide, it’s important to understand why Pixverse AI is an excellent choice for mask removal. The tool is designed to recognize objects in an image and analyze the best way to remove them without affecting the rest of the photo. Pixverse’s AI uses advanced algorithms to fill in the area where the mask was, blending it seamlessly with the surrounding background or content.
Unlike traditional editing software that requires manual adjustments, Pixverse AI automates this process, saving you time while ensuring high-quality results. Whether you want to remove a mask from a selfie, group photo, or an outdoor image, the tool can detect and eliminate it efficiently without compromising image quality.
Step-by-Step Guide to Removing a Mask from Photo Using Pixverse AI
Step 1: Upload Your Photo to Pixverse AI
The first step in using Pixverse AI to remove a mask from your photo is to upload the image to the platform. Here’s how you do it:
- Visit the Pixverse website or open the Pixverse AI app.
- Click on the “Upload” button to select the photo you want to edit from your device.
- Make sure the image is of high resolution for the best results. The higher the quality of the photo, the better Pixverse AI can work to remove the mask seamlessly.
Step 2: Select the Area with the Mask
Once your photo is uploaded, you will need to identify the mask area you want to remove. Pixverse AI typically uses an automatic object detection system, so in most cases, it will highlight the mask for you. However, if you need to refine the selection, use the provided editing tools:
- Use the brush or lasso tool to highlight the mask you want to remove.
- Adjust the brush size for finer control when selecting smaller areas.
- Ensure that the mask area is fully covered by the tool to ensure complete removal.
Step 3: Use the AI Removal Tool
With the mask selected, it’s time to let Pixverse AI do its magic:
- Click on the “Remove” button or “AI Remove” feature.
- Pixverse AI will analyze the photo and automatically remove the mask from the selected area.
- The tool will also regenerate the background, ensuring the removed mask blends seamlessly with the surrounding environment.
Pixverse AI is capable of adjusting the pixels of the surrounding background to make the transition appear smooth. This process eliminates the need for manual touch-ups, which is particularly useful when dealing with complex backgrounds.
Step 4: Review and Make Adjustments
After the mask removal is complete, it’s time to review the result:
- Inspect the image carefully to ensure that no traces of the mask remain.
- If you notice any imperfections, you can use Pixverse’s manual touch-up tools to refine the image further.
- You may want to adjust brightness, contrast, or sharpness to enhance the final look of the photo.
Pixverse AI gives you control over the finished product, allowing for fine-tuning in case the AI did not perfect the result in the first pass.
Step 5: Save and Download Your Edited Photo
Once you are satisfied with the result, it’s time to save your image. Pixverse AI typically offers several file formats for download, such as PNG or JPEG, allowing you to choose the best format for your needs. Additionally, you can download the image in various resolutions, depending on your requirements.
- Click the “Download” button to save the edited photo to your device.
- Share your image on social media, use it for your online store, or print it for other purposes!
Tips for Getting the Best Results from Pixverse AI
While Pixverse AI does most of the work for you, here are some tips to ensure you achieve the best possible results:
- Use High-Quality Photos: Start with high-resolution images. Pixverse AI can work with lower-quality photos, but the better the resolution, the better the outcome.
- Ensure Proper Mask Selection: Be careful when selecting the mask area. The more precise your selection, the better the results will be.
- Avoid Cluttered Backgrounds: If the background is overly complex, it may require additional editing after mask removal. Pixverse AI does a great job, but simple backgrounds will yield cleaner results.
- Test the Manual Tools: If the AI doesn’t perfectly remove the mask, use Pixverse’s manual editing tools to correct any imperfections.
Advantages of Using Pixverse AI for Mask Removal
- Time-Saving: The AI removes the need for manual touch-ups, making the process significantly faster than traditional photo editing.
- Accuracy: Pixverse AI is designed to detect objects and automatically adjust the background, ensuring a seamless result.
- User-Friendly: No professional editing skills are needed to use Pixverse AI, making it accessible for beginners.
- Cost-Effective: Pixverse AI offers affordable pricing compared to other advanced photo editing software, making it an excellent choice for casual users and professionals alike.
Conclusion
Pixverse AI offers a user-friendly and efficient solution for removing masks from photos, leveraging advanced artificial intelligence to save time while delivering high-quality results. The process is straightforward, involving uploading the photo, selecting the mask area, allowing the AI to remove it, and downloading the final image. The result is a flawless photo where the mask is removed seamlessly, and the surrounding background is intact.
Whether you are a content creator, photographer, or simply someone looking to improve their photos, Pixverse AI is a powerful tool that can simplify the editing process. With its intuitive interface and fast processing, Pixverse is one of the best AI-powered photo editing solutions on the market today. By following the steps outlined in this guide, you can confidently remove masks and other unwanted objects from your images, resulting in professional-quality photos every time.
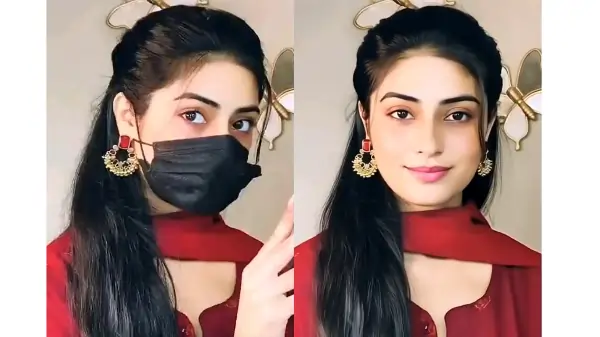
PROMPT:
Remove her mask and after the removal of the mask, see the same girl’s face, nothing else is visible and no girl appears.
Remove THIS
Frequently Asked Questions (FAQs)
1. How accurate is Pixverse AI when removing masks from photos?
Pixverse AI is highly accurate in detecting and removing masks from photos. The tool uses advanced machine learning algorithms to analyze the image and seamlessly blend the background after the mask is removed. While it works well for most photos, complex backgrounds may require slight manual adjustments for perfection.
2. Do I need to be a professional to use Pixverse AI for mask removal?
No, Pixverse AI is designed for users of all skill levels, including beginners. Its user-friendly interface allows anyone to upload their photos, select the area to remove the mask, and let the AI handle the rest. There’s no need for professional editing skills or advanced knowledge of photo editing software.
3. Can Pixverse AI handle low-resolution images?
While Pixverse AI works best with high-resolution images, it can still process low-resolution photos. However, the results may not be as sharp or detailed as with higher-quality images. For the best results, it’s recommended to upload clear and high-resolution photos.
4. Is Pixverse AI a paid service?
Pixverse AI typically offers both free and paid options. The free version may have limitations on features or image resolution, while the paid version provides access to more advanced tools and higher-quality downloads. Pricing varies depending on the plan you choose.
5. What other features does Pixverse AI offer besides mask removal?
In addition to mask removal, Pixverse AI offers several other photo editing features, including object removal, background adjustment, and image enhancement. It also provides tools for improving brightness, contrast, sharpness, and overall photo quality, making it a versatile solution for all your photo editing needs.


